
The basement is one part of our house that is completely disgusting. Right now, we use it as storage and a place for all the kids junk (aka toys). It is not a place anyone really wants to hang out.
We had hoped to have some money to redo our basement, but our major kitchen remodel last year sucked us dry. So until we are able to save up for a total basement renovation, we decided just to spend a couple thousand bucks and "upgrade" the dingy basement.
What seemed like an easy project of painting concrete walls and floor, turned into a month long ordeal.
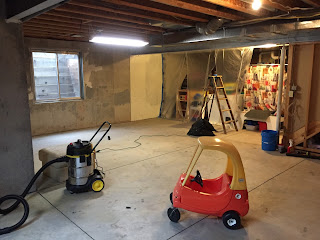
First here is what we started with (well after I had already cleared out all the toys/junk, washed all the concrete walls, vacuumed 25 years of dust/spiders from the walls, ceiling and swept...) This is what we had, still a pretty dingy looking basement


Then, I continued on to paint all the pipes on the walls black


We had hoped to have some money to redo our basement, but our major kitchen remodel last year sucked us dry. So until we are able to save up for a total basement renovation, we decided just to spend a couple thousand bucks and "upgrade" the dingy basement.
What seemed like an easy project of painting concrete walls and floor, turned into a month long ordeal.
First here is what we started with (well after I had already cleared out all the toys/junk, washed all the concrete walls, vacuumed 25 years of dust/spiders from the walls, ceiling and swept...) This is what we had, still a pretty dingy looking basement


The next step was to prep the space for painting. I had to seal off the area where we would make the utility room with plastic, then taped all the floors with painters paper


Next, we rented a sprayer for a couple days to spray the ceiling. Since it was a mixture of bare wood, plastic & metal, we had to spray a few coats of primer over everything:


After the primer dried, we were able to spray it all black:

Then, I continued on to paint all the pipes on the walls black


Next, it was on to the floors. Originally I wanted to polish or stain the concrete floors. But after many frustrations we discovered that was not something we could do ourselves and it was not in the budget to hire someone to do it. So we had to move on to plan b, paint the concrete. You can see some of our paint choices in the picture above...
But before we could paint, the floor had to be prepped. Meaning I had to scrub every inch of that floor, multiple times. I had to buy a shopvac to assist in the process. It was scrubbed with soapy water, then 3 coats of TSP water, then back to 2 coats of soapy water. This was the worst part of the whole job...

And after all that cleaning, I finally painted the floors with several coats of concrete floor paint. And then I forgot to take a picture before I moved all basement junk back in. Here you can kind of see the painted floor underneath everything. You can also see the next part of the project which was framing out the wall for the utility room.

We had someone frame out the utility wall, and then Luke took on the task of drywalling that wall, as well as drywalling the previously framed section under the stairs

And then I totally forgot to take pictures of the finished project.
***UPDATE*** November: here are a few pictures of the basement, it is still holding up nicely.


And to compare how far we've come, here are a few before/after shots:


No comments:
Post a Comment